2023 – A Year of Stitches

2023 was quite a busy year embroidery wise. In this review I will focus on some of the highlights for me, with a brief summary of the year as a whole.

The Dundee Tapestry 

This was without a doubt the highlight of the year for me. I was responsible for one panel – Dundee Communities. It was the first panel to get started way  back in 2021 and one of the last to be completed. In 2023 I worked on the panel in four separate stages, starting in January and finishing in November.  The gaps were to allow the design team to figure out what to include and then draw the ideas on the canvas. 

This took up around 280 hours of work in 2023 alone. Altogether I spent around 440 hours working on the panel.  The whole tapestry – 35 panels – is now on display in the V&A Dundee. The exhibition lasts until 28th April. Well worth a visit.

Palestinian embroidery

I had not done much Palestinian embroidery last year. But the news, images and accounts of the horrifying Israeli onslaught against not just Gaza, but the West Bank was just too much to ignore. The killings and destruction in the West Bank is confirmation that Israel is wantonly attacking and destroying all Palestinians as there is almost no Hamas presence in the West Bank.

In response to the ongoing Israeli attacks Palestinian embroiderers from all over the world were quick to express their horror and to demonstrate their identity as Palestinians, through their embroidery. Luckily many have freely shared their work and designs.

I was able to pick up on one – Cypress pendant, a design from Gaza – which was make available by the Tirazain Initiative. I used this motif as part of a phone case. The other motifs are also traditional Palestinian.  This year I have already started on three other free designs, two of which are based on the map of Palestine.

Antique Scottish lace pattern

I came across this love pattern on the net, and decided to give it a go. I stitched it in cross stitch on an 18ct Aida in cream. Sulky threads in green and purple, which I have told were the colours of the Suffragettes.

Overview

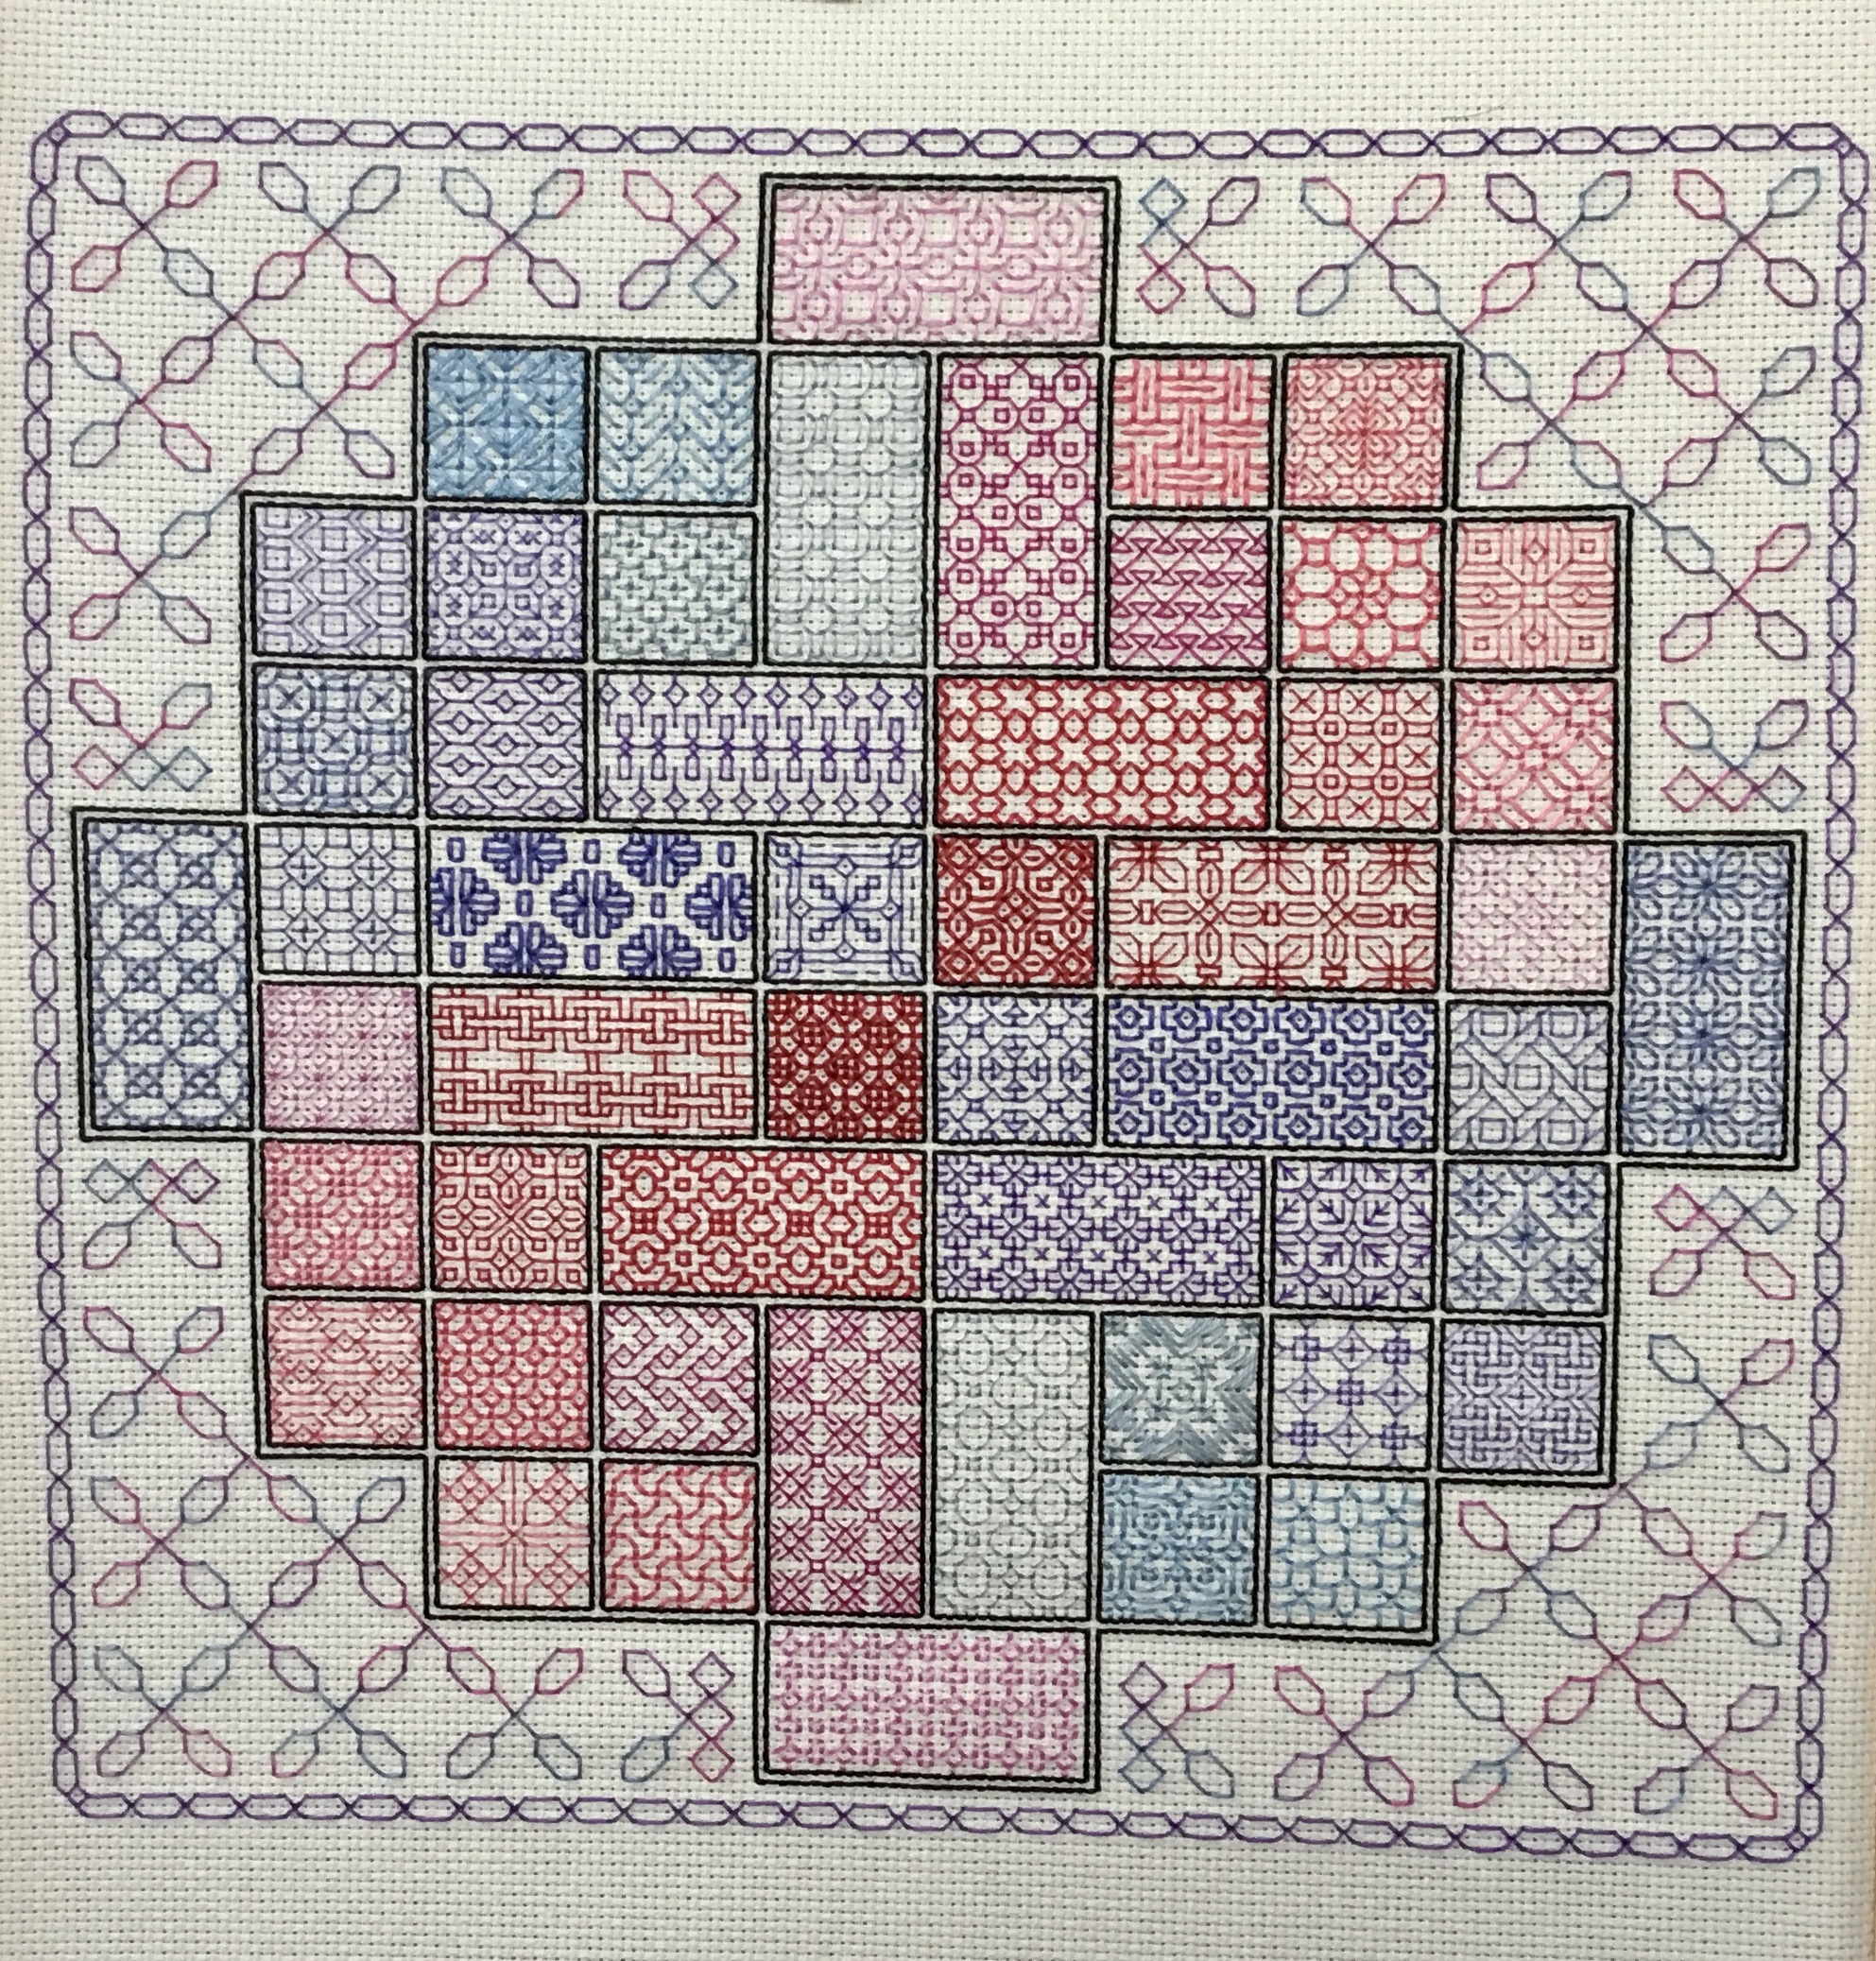
As is the case in most years I work in a variety of embroidery styles – Bargello, Blackwork, Palestinian, Surface and others that don’t fit into any of the previous. Surface embroidery was of course the work on the Tapestry and took up most of my time. Blackwork was the other area which involved a lot of hours work – 200 to be precise. This included two SALs – Peppermint Purple and Tangled threads and things.

Altogether I spent around 785 hours working on embroidery. I usually try to do at least a couple of hours stitching per day, so 785 fits well into this pattern.

2021 Peppermint Purple SAL

I haven’t previously been a fan of SALs, but this year I have started three, all from Peppermint Purple. Dutch tiles was finished earlier in the year, while the Moroccan tiles is still on the go and won’t be finished until next year. However the first one I started, which was a year long SAL is now finally finished. This was a free one and comprised a weekly pattern. Hence the wait until today to finish. Here it is.

As you can see this is a Blackwork composition. Quite an achievement on the part of Clare from Peppermint Purple to come up with 52 different blackwork designs! Like them all, though some more than others. The fabric is 18ct Aida in white. The threads are all DMC cotton and I used a mixture of one and two strands for the stitching.

As regards the colour scheme, I decided to vary a bit from the one recommended by Clare. My choice was to limit myself to two broad colour ranges. The first is a mix of blue and violet, while the other is a mix of rose, plum and garnet. I divided the blocks into four quadrants with the two colour schemes in opposite quadrants. Quite pleased with this outcome.

For the border I decided to go for my own. The outer edge is a simple hexagon, stitched with a dark purple from the Sulky range. The inner border is a pattern from The Art of Blackwork Embroidery by Rosemary Drysdale. I chose this one as I wanted a light and open border that would not distract from the main body. Another Sulky thread was used, this time a variegated one blue, purple and pink.

The work lasted a whole year and took up 57 hours of stitching. Well worth it. Next week I start on another one – the 2022 SAL. If you fancy trying it out check here. Happy stitching!

Chest Panel No2

llDespite not posting for some time, I have been rather busy with embroidery. Most of the time I have had four projects on the go. One will take me till the end of the year and two others into next year. I did manage to complete one project – a design for a chest panel for a thobe, a traditional Palestinian dress. Here it is.

The selection of traditional motifs is my own, though the overall design is roughly based on a design by Jordan Nasser, a Palestinian American embroiderer. You can see this one here. My composition features the following traditional motifs; on the upper part – Carnation border; carnation; rosebuds; moon of Bethlehem and apple branch. On the lower part – Bachelor’s cushion border; earrings; amulet; apple branch; bridal comb; arch; star disc and rainbow.

This was a fun project to work on, particularly as I did not have a thought out plan for the project. I had a few ideas of some of the motifs I wanted to use, carnation and star disc for example. But the rest were choices I made that would fit into the space available. Good exercise!

I have worked with a restricted colour scheme – medium violet and medium lavender with plum for a bit of bright contrast. All from the DMC pearl cotton No8 range. The fabric is Aida 16ct in white.

My other projects include the Dundee Tapestry and two SALs from Peppermint Purple.

Autumn

I have been pretty busy with various embroidery projects, some of which are still ongoing. Nevertheless I have managed to finish one small project. I am calling this Autumn as the colours are very autumnal. The yarn is a gorgeous mix of alpaca and silk and comes from Elvincraft in the Isle of Skye. Spun for knitting or lace making the yarn has to be cut into stitchable lengths for embroidery. This time I decided to cut the yarn into its three main colour groups – purple, orange and green. Here it is.

The design, if it can actually be called a design, is a rather haphazard medley of curvy shapes. The dark purple stands out which is why I used it for the smaller shapes. The stitching is silk shading or long and short stitch. The fabric is a fine linen. The outline is meant to be a circle, but turned out to be a somewhat wobbly one. It is now safely ensconced in its Nurge No 4 wooden frame, ready for hanging, if I only had a spare place to hang it. This work took up 33 and a half hours of stitching.

More Bargello

This project was a bit of an experiment. I started with a design from Bargello Needlepoint by Dorothy Kaestner. This was a variation on a green leaf border. I was quite taken with this idea and decided to try and complete it as a four way bargello. Easier said than done! But with a few adjustments here and there and a lot of blood, sweat and tears I did finally finish it off.

The fabric is a 14count Aida fabric in a pale grey. The threads are all but one from the Appleton range of wool threads. The odd one out is a DMC tapestry wool. With the Appleton threads I used three strands, but made do with only two strands with the DMC tapestry wool.

The central pattern, the leaves in Kaestner’s original, is stitched in four blues – royal blue. The lightest is the DMC tapestry thread. The little circles or half circles are stitched in greens – early english green – using tent stitch. I firstly tried to stitch these in bargello, but it did not work at all. So tent stitch it was.

The background is where it all got a bit complicated as the original was not designed as a four way pattern. And getting the alignment right to accommodate the little green circles was another headache. However it all handstickcame more or less acceptable in the end. For this part of the work I used four shades of fuchsia.

To finish the piece off I stitched a circle around the outside with two strands of dark royal blue in stem stitch. It is now safely ensconced in a Nurge No4 hoop. Altogether this took up nearly 29 hours of stitching.

Haven’t as yet worked out a title for this piece. Any suggestions?

Dutch Tiles

This was a rather grand project, a SAL offered by PeppermintPurple. As the title suggests the project is inspired by patterns on Dutch tiles, re-interpreted for blackwork embroidery. The designs came in eight batches, each one featuring two tiles. I started in March and finished the stitching at least, today 5th July.

The embroidery could be stitched on various fabric counts. I chose a 14 count Aida in lavender. This was to go with the thread I had selected – an Anchor cotton in violet, number 99. I think blue was the recommended colour, but I like all kinds of purples.

Most people who have done this SAL seem to have used just a single strand of thread. I nearly always use a mix of one, two and three strands when I do blackwork embroidery. In this case most of the work is with two strands, but each tile features some parts in just a single strand. I like the changes in texture this offers.

On the whole this was a relatively easy project to follow, though some of the patterns were a bit complex and demanded extra attention to the details.

Working on this took me 92 hours of stitching time spread over 45 days. The finished square measures just over 28cmX28cm. Will now need to smooth the piece out and stretch it even, before deciding what to do with it. Decisions, decisions!

I am also working on another SAL from PeppermintPurple. This one is a fee one and lasts all year, so just half way there at the moment.

Tree of Life

This little project is another one using traditional Palestinian motifs. These motifs, apart from one, all come from The Art of Palestinian Embroidery, by Leila El Khalidi. Here it is.

The finished composition only emerged gradually. When I started this project all I had in mind was to use a circular frame and a 14count Aida fabric in a pale grey and to limit myself to two colours – red and a light blue. I had no particular motifs in mind. After lots of flicking back and forth through El Khalidi’s book, I decided to start with the Tree of Life. Which is why I used this as the title for the whole project!

The next or concurrent decision was to stitch the Tree of Life twice, one in the upper left quadrant and the other in the lower right quadrant. This left the other two quadrants to fill. Once again, after much perusal of the book I finally went for a motif known as the Holy Star of Bethlehem.

So far so good, but there was still quite a lot of space to fill. Back to the book! This time I chose a variation of the Byzantine cross, which now occupies the top and the bottom.

@alister7More or less finished, but there was still a little empty space on either side of the trunk of the Tree of Life. On the this occasion I forsook Leila El Khalidi’s book and selected a little motif from a design by @jordannassar. Earlier in the year he had very kindly donated a traditional Palestinian design to @themosaicrooms, available free to all comers. I hope he doesn’t mind my borrowing this motif for my own design.

To complete the composition I stitched a circular outline with whipped backstitch.

This was a fun and enjoyable little project, which only took up 14 hours of actual stitching. The threads are all from the DMC pearl cotton range. The red is no. 321, light blue is no.334 and the dark blue for the outline is no. 311. The frame is a Nurge no 4 and is approximately 19cm in diameter. Just need to tidy up the back and find somewhere to hang it.

Kathleen

This was another project that took a very long time to finish. Mainly because it was well out of my comfort zone. The project was one of the Community Stitch Challenges from TextileArtist.org. This particular one was by Sue Stone and the challenge was to turn a photo into a work of embroidery. Seemed a good idea at the time, and off I went to work, way back on 3rd April. Here is the finished piece.

Before I could begin stitching I had to spend a lot of time working out the composition itself as it involves a fair amount of appliqué. Still I did work out a framework and the fabrics and started stitching them together. As I don’t have a sewing machine, I had to do all this by hand, which explains why it is a bit messy in places. The various pieces were stitched together with a single strand of Sulky thread in blues. The outside with a simple backstitch and the inside with herringbone and buttonhole stitches. The background fabrics were all from pieces lying around.

The fabric for the photo is a Kona cotton in ivory. The photo I chose is one from a holiday we had in Palma de Mallorca way back in 2006. It has always been one of Kathleen’s favourites. I used tracing paper to transfer the image onto the cotton fabric.

For the striped top I used Kona cotton in white. The stripes are stitched with a whipped backstitch with two strands of DMC cotton in medium antique blue. For the shawl I used cut out bits from a shawl I bought in a charity shop. I originally wanted to try and fold the fabric, but found this impossible to do. Way beyond my pay grade! So I made do with some backstitches in a magenta Sulky thread to try and give the impression of folds.

The hair is stitched with various lengths of Ghiordes knot stitch. Single strands in bunches of three or four were used for each stitch. Four shades of DMC browns make up the hair – ultra very light mocha brown, light mocha brown, ultra dark beige brown and black brown. Most of the face is made up of a backstitch in black. The eyelashes are in black brown. For the eyes and the lips I used Sulky threads in light blue and red.

All in all I am quite pleased with this first attempt at this kind of embroidery. The stitching took up 21 hours over 11 days. The finished pieces measures 24cmx18cm. May try something similar in the future.

Spindrift

I have been very busy with embroidery over the last couple of months. However mostly with long term projects, a couple of SALs for example. So there has been nothing in the way of completed work to show. Until now that is. A few days ago I finally finished a Bargello piece I was working on. It is a slight variation on a design from Dorothy Kaestner’s book – Bargello Needlepoint. There she gave the design the title of Spindrift. Here is my attempt.

The sphere at the centre is a bit smaller than the one in Dorothy Kaestner’s design. I did this to make the piece more manageable. A big mistake! With a smaller sphere the rest of the pattern did not fit. It took me far too much time, restitching and a fair amount of anglo-saxon expletives to finally work out a solution.

The other change was to the number of blues. In the original there were 11 shades. Alas, I did not have 11 shades of any colour. So I made do with seven shades, which meant some of the shades were repeated. Still it works fine I think.

The fabric is an 18ct Aida in pale yellow/green. This does not show up in the photo, where it looks like a light grey. For the sphere I used three orange shades and two yellow shades, all from the DMC tapestry wool range. The surround in blue is made up of three shades of royal blue from Appletons 2 ply range, and four shades from the DMC range. For all the stitching I used two strands of the wool.

The finished piece is approximately 20cmx20cm. Now need to decide what to do with it! I spent 29 and a half hours on this, but spread over 21 days. I rather like this design and may well repeat it with an other colour scheme. But this time with the larger sphere!

Roman Rose

This is another piece to feature one of the traditional Palestinian motifs. This one is known as Roman Rose, and this particular design comes from Margarita Skinner’s book – Palestinian Embroidery Motifs, A treasury of stitches 1850 -1950. I have used many of the designs in this wonderful book, but this is the first time I have used Roman Rose.

The fabric is a 14 ct Aida in pale blue. It is a bit of a left over from a previous piece. The threads are all DMC pearl cotton No 8. I worked with two colours, lavender and rose, with two shades for each main colour. The idea was to have at least two colours for each rose, which I think works quite well.

The stitched area is just 23cmX5.5cm and I have finished it off as a wall hanging.